
Do you want to restore database backup from cPanel? If yes then don’t worry!
In this article, you will learn how you can easily restore database backup from cPanel by following just 5 simple steps.
Without any further due, let’s move on to the topic…
Steps to restore database backup from cPanel :
You just need to follow the following steps one by one in order to restore your database backup.
STEP 1 : Login To Your cPanel Account
- Go to ShoutCoder.
- Login your Account.
- Select your Active Product/Services.
- Click on “Login to cPanel” under Action Tab.
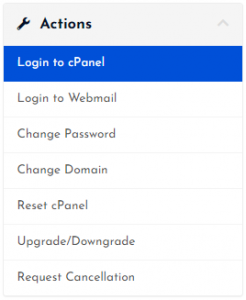
- Then you will automatically redirected to your cPanel Account.
Or, If you have cPanel login details then you can easily login to your cPanel account by visiting yourdomain.com/cpanel.
STEP 2 – Go To JetBackup
- Search for “JetBackup” in the search tab.
- Click on “JetBackup” under Files Section.

- Wait for few seconds until the next page appears.
STEP 3 – Choose ‘Database Backups’ Option
You will get many backups option in which you need to select Database Backups as per the need here i.e. to restore database backup.
- Click on Database Backups.

- Wait for few seconds.
STEP 4 – Select Your Preferred Database
- Here, you get different database backups available.
- Choose the preferred one according to the creation date.
- Then, click on the RESTORE button next to your selected database backup.

- Now, click on “Add to Restore Queue”.

- You will get a success message as well as an info message as shown below :
![]()
STEP 5 – Sit & Wait
- Yeah! you just need to wait for few minutes.
- All Done.
Thanks for reading this article. Hope, you found this article helpful and your query regarding how to restore database backup from cPanel is now solved.
If you still have any query or doubt then please let us know through your comments in the comment section below.


